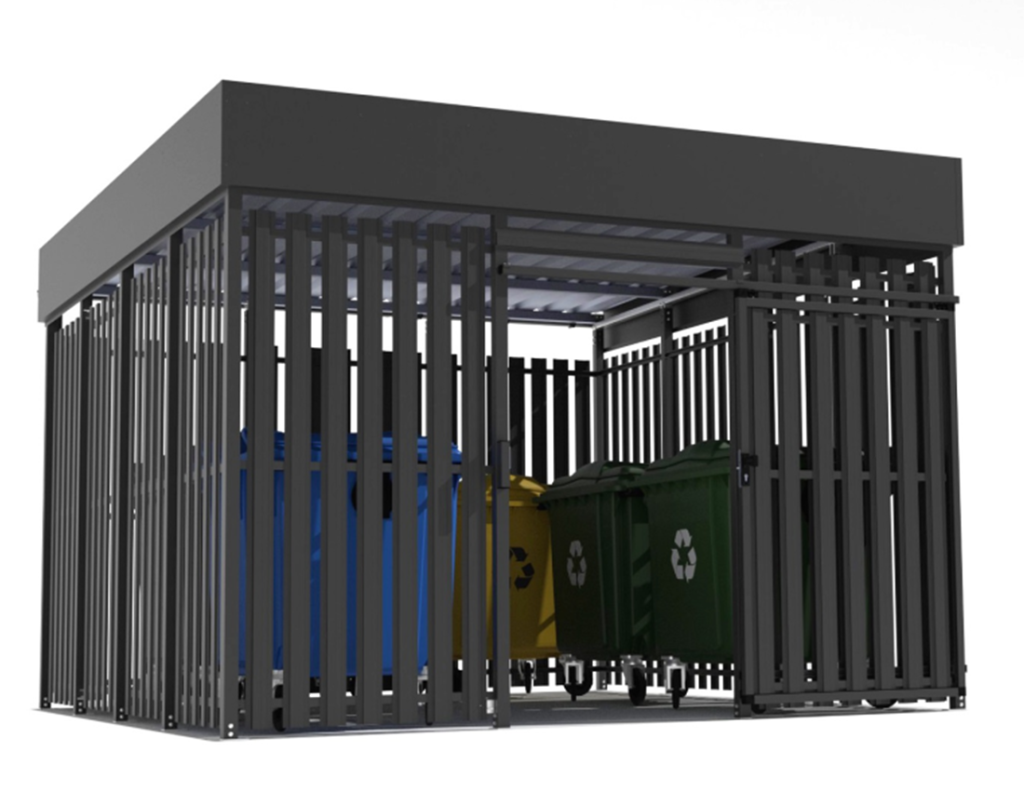
Made-to-measure waste shelter
The waste area is often the first thing you notice by a building — and, unfortunately, it’s also the spot that most easily slips out of control. When the bins stand out in plain sight, the area looks messy, and wind and animals only add to the problem. A made-to-measure waste shelter lets you bring order to the space, screen the containers and raise the standard of the surroundings without any fuss. A well-designed bin shelter isn’t only about looks — it’s also about hygiene and everyday convenience for users.
Why a bin shelter improves looks and order
Waste shelters bring order to waste management: they mark out a fixed zone, limit waste “spilling over” into the surroundings, protect against rain and wind, and make access harder for outsiders. In practice, everyone benefits: residents (the area is cleaner and more predictable), property managers (it’s easier to keep things tidy) and collection crews (container logistics are simpler).
What “made-to-measure” actually means
“Made to measure” means matching three things:
- the number and type of containers (segregation often calls for several fractions),
- accessibility — how residents walk in and how the containers are wheeled out,
- collection logistics — whether and how the waste-collection vehicle pulls up.
In practice, the dimensions and type of structure are agreed during the conversation, so the build fits both its surroundings and the technical requirements.
Materials and durability
Waste shelters work outdoors all year round, so durability matters. The structure can be made from hard-wearing materials (aluminium or steel), and the build is matched to the look of the estate. Materials are chosen so the structure copes well with the weather and heavy use (frequent opening, moving containers around, servicing).
Ventilation and wall types
The shelters that work best combine good looks with ventilation. That’s why you’ll see different wall types: solid, openwork or slatted. Slatted and openwork solutions allow air to flow — important in day-to-day use — while visually “tidying up” the zone, because the containers are less exposed to view.
Access – open or lockable
Depending on the location, a shelter can be open to everyone or have restricted access. When there’s a problem with illegal dumping or use by outsiders, locking it makes sense. Options include lockable doors with code or key access, as well as key-only door variants where access needs to be restricted. This works especially well on estates where the waste zone is meant to be “for residents only”.
Roof and weather protection
The roof isn’t a detail — it’s practical. Pitched roofs help water run off and keep the whole thing in better condition, and the containers are less exposed to rain. The shelter is also there to protect against wind, which can “pull out” lightweight waste, and against animals that may rummage through the containers.
Waste-collection logistics – a key part of the design
The biggest game-changer is planning the waste collection. A shelter can look great, but if the containers can’t be wheeled out easily on collection day, frustration sets in. Sliding options that make it easier for collection vehicles to access the bins can be the answer. Even with shelters that have no sliding elements, it’s worth thinking through the width of the entrance, the direction the doors open and a spot to set the containers down briefly on collection day.
Waste segregation and organising the space
Modern estates usually have several waste fractions, plus bulky waste and occasional “drives” (e.g. e-waste). That’s why a made-to-measure waste shelter should account not only for what’s there today, but also for how the zone will work across the seasons and over the year. Good practice is to allow space for convenient access to every container and for rearranging the layout if segregation rules change. It’s also worth planning information boards and fraction labels right away, so users don’t have to guess where to put their waste.
Lighting and signage
The waste zone is used in the evening just as often as during the day. Lighting (even simple, energy-efficient lighting) reduces segregation mistakes and improves safety. It also makes the crew’s job easier on collection day. If the area is dark, this is one of those extras you really feel in everyday use.
Integration with other modules
Shelters are a piece of “street furniture” — the better you plan them as a single “zone”, the fewer random objects end up scattered around the site. In practice it often pays to combine solutions: a waste shelter plus a bicycle shelter or another module in one spot. You get a consistent look, easier navigation around the site and fewer disputes over space.
Installation and groundwork
Every location is different, so the structure has to be matched to the ground and the lie of the land. In practice that means choosing the right fixing method and checking that the zone doesn’t clash with footpaths, service access and parking spaces. If the shelter has doors, room “to open them” and ease of carrying waste bags in matter too.
Keeping it tidy and day-to-day use
A well-designed shelter helps keep things clean, but it’s worth planning for the simple things too: being able to easily wash down the floor of the zone, and solutions that limit lightweight waste blowing around. These are the small details that decide whether the zone still looks good a few months down the line.
Who a made-to-measure waste shelter is for
It’s most often used by residential estates and housing communities, but also office buildings, workplaces, schools and public facilities. In every case the goal is similar: an attractive, functional waste zone that doesn’t spoil the look of the place. For developers it’s also part of the standard of an investment — better to design a coherent zone from the start than to “patch up” the problem later with a makeshift fix.
The most common mistakes when designing a waste shelter
In practice, three things cause the most trouble: a “just-fits” design with no room to manoeuvre the containers, a lack of ventilation in a heavily enclosed build, and failing to account for collection-vehicle access. The good news: all of this can be caught at the design stage if you put together a solid brief and show the location.
The ordering process
In short: you give the number of containers and the type of segregation, describe the location and how the waste is collected, and then you receive a made-to-measure proposal. Once approved, the lead time and installation are scheduled. If the zone is to be lockable, the type of access (key/code) and how users are organised are agreed right away.
A tip for a quick start
To get an accurate quote, prepare: the number and type of containers, the approximate size of the zone, photos of the location, and information on how the waste-collection vehicle pulls up. If you have guidelines from the property manager, include them — it’s easier to match the look and the details of the build.
Want your waste zone to finally look the part? Send the basics (containers, photos, dimensions and collection access) and you’ll get a made-to-measure waste shelter proposal. It’s a solution that makes a difference every single day — both for image and for everyday use.
